This tutorial explains how you can enter recovery mode on the Nokia 3 Android phone. Nokia recently unveiled their new Android smartphones, and we have our hands-on with the new Nokia 3. Typically, recovery mode is accessed by pressing phone buttons, but we haven’t been able to find any button combination that works for this phone. In Nokia’s case, the recovery acts as a central hub for all other debug and developer modes. The way to access is quite simple and straight forward. Whether you have a custom recovery like TWRP running or you are trying to access the stock one, this guide will apply to all. Nokia 3 smartphone ships with stock recovery which is user accessible and accessing it doesn’t void warranty. Read further to find out more details on how to access recovery mode on the Nokia 3.
Many of you might even have a custom recovery installed, like TWRP or ClockworkMod — the famous two. The custom recovery portal is quite big, it allows you to flash ROMs, mods and themes. If you are not into such heavy modifying, the recovery can act as a utility which you can use to format data, wipe cache and apply updates. Let’s move down further and see how can you enter Recovery Mode on the Nokia 3. Some Android phones, like the Sony Xperia series, do not come with a stock Android recovery at all, and in that case, we would have to load a custom recovery first to that phone and then enter it. However, Nokia Android phones do come with a stock recovery and some Android specific functions i.e. installing a software update, doing a full hard reset etc. are only performed through a Recovery Mode. Whenever you do them, the phone first takes you to the stock Android recovery and then performs that specific function.You can enter Recovery Mode on the Nokia 3 using the following two methods:
by ADB on Windows
by ADB on Mac OS X
Let’s have a look at each method below. You can use whichever way you find the easiest. The following steps can be used to enter Recovery Mode on the Nokia 3 (all variants).
Method 1 – Enter Recovery Mode using ADB on Windows
Step 1 – Download Android SDK from the Android Developers website and install. Also set it up by downloading platform-tools and USB drivers package in SDK. Tutorial given here: How to Set up ADB and Fastboot on Windows.
or
Step 1 –Download ADB / Fastboot – Android SDK Platform Tools separate package and install on your computer. Download from the following links depending on your OS and extract it anywhere in your computer.
Windows: Download platform-tools-latest-windows.zip
MacOS: Download platform-tools-latest-darwin.zip
Linux: Download platform-tools-latest-linux.zip
Step 2 – Connect Nokia 3 to the PC with a USB cable and install ADB drivers (if needed).
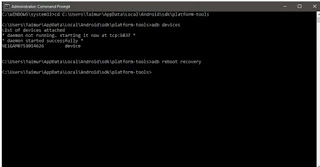
Step 3 – Navigate to <ANDROID-SDK-PATH>\platform-tools directory and open Command Prompt (Shift + Right-click anywhere in the folder > Open Command Prompt).
Step 4 – Type in the following command and press Enter.
adb reboot recovery.
Step 5 – Your Nokia 3 will turn OFF and then boot into the Recovery Mode. Navigate up and down using the volume keys and select with the Power button.
If you need any help regarding this, feel free to drop us a comment below or read: How to Enter Recovery Mode on Any Android Device.


No comments:
Post a Comment