Thursday, 13 July 2017

Xiaomi Redmi 4X: Official TWRP Recovery Now Available (How to Install)

If you are looking for development on your Xiaomi Redmi 4X, then there is good news for you. TeamWin has released official TWRP recovery for Redmi 4X. TWRP is a necessary tool for installing custom ROMs, flash kernels, and flash other files. If you are interested you can now download TWRP (twrp-3.1.1-0-santoni.img) for Redmi 4X (code-named santoni) and flash via ADB. Check out the guide below.

If you are new to TWRP recovery and to be able to install TWRP custom recovery, you need unlocked bootloader on Xiaomi Redmi 4X. Unlocking bootloader of Xiaomi devices is not an easy process. You need to get special permission from Xiaomi. Check this guide to know how to unlock bootloader of Xiaomi devices.

Once unlocking the bootloader, you can easily flash TWRP recovery via ADB. After installing TWRP recovery, you can flash custom ROMs, custom kernels and other files, and customize the device to your liking. Also, it lets you backup system, partitions and more.
Note that, Windows users need to install fastboot driver for Redmi 4X on their PC. Also, you should enable USB Debugging and OEM Unlock options on the phone in Developer Options menu.

How to install TWRP recovery on Xiaomi Redmi 4X

1. First unlock your device bootloader (Guide).
2. Download Redmi 4X TWRP 3.1.1-0 recovery image (santoni) for America [HERE] and for Europe [HERE]
3. Rename the downloaded TWRP to ‘recovery.img’, then copy and paste the recovery image inside the ADB installation folder.
4. Connect your device to your PC and open a command window inside the ADB installation folder (press Shift key, right click and select open command window here option)
5. Now, issue the below command to boot your device into fastboot mode:
adb reboot bootloader
6. Now, flash TWRP recovery by issuing the below command:
fastboot flash recovery recovery.img
Once done, reboot your phone by issuing the command ‘fastboot reboot’.
and enjoy.
(Source – TeamWin)

How to Get Android 7.1.1 Nougat on Moto G Turbo Edition (Custom ROM)

Moto G Turbo Edition owners can now enjoy Android 7.1.1 Nougat and its awesome features unofficially. A ported version of Android 7.1.1 Nougat ROM is now available for Moto G Turbo Edition (code-named merlin), which you can download and flash via TWRP recovery. Ported from Moto X Play Nougat ROM, this ROM supports VoLTE, and brings all the native features of Android Nougat.

Motorola has already confirmed that the Moto G Turbo Edition will not update to Android Nougat, and it will stay on Android Marshmallow. However, if you are excited to taste the latest Android 7.1.1 Nougat on it, then the ported Nougat ROM may be a right choice. The ROM status is beta, however all the basic functions are working fine.

Android 7.1.1 Nougat brings many enhancements including new multitasking features, more efficient notification controls, improved data saver, better battery management and May 2017 security patches. Also, the ROM includes Substratum Theme Engine, Magisk Manager, Ambient Display, SIM card disabling feature and more.
If you are interested, read on to know to install Android 7.1.1 Nougat ported ROM on Moto G Turbo Edition. However, note that your device should have unlocked bootloader and installed latest version of TWRP.

Important: The ROM is not stable. Things such as video Recoding in Moto Camera, GPS and may be more will not work.

How to Install Android 7.1.1 on Moto G Turbo edition

Disclaimer: Follow the instruction at your own risk. We will not be liable if any damage occurs to your device and/or its components. It is recommended for technically talented users only.
1. Download ported Nougat ROM (merlin) (merlin_retasia_nougat_7.1.1_by_Innfinite 4evr.zip) from here. Also download Wi-Fi patcher (update-v1-stock-nougat-merlin-Innfinite4evr.zip) from here 
2. Save both zip file on your phone storage (The ROM does not require Gapps package)
3. Boot your phone into TWRP recovery, select ‘Backup’ and create a Nandroid backup
4. Now, select ‘Wipe’ and make a full wipe (system, data, cache, dalvik)
5. From main TWRP recovery menu, select ‘Install’, navigate to ROM zip and swipe to continue. Once doe, select update zip and swipe to continue.
6. Now, select ‘Wipe’ and wipe cache and then reboot your phone.


Setup your new ROM and enjoy all the features of Android 7.1.1 Nougat on your Moto G Turbo edition (Source – Innfinite4evr)

Lenovo Vibe P1 Received Android 6.0 Marshmallow OTA Update (How to Update)

Lenovo has started rolling out the Android 6.0 Marshmallow OTA (over-the-air) update to LenovoVibe P1. As the OTA update rolled out in phases, it will take a while to get the update notification on your Vibe P1. The new update will include Marshmallow’s core features, such as Doze mode, new app permission model, etc. as well as performance enhancements and security patches.

The Android 6.0 Marshmallow update for Lenovo Vibe P1 (P1A42) weighs 1.6GB (build number P1a42S263) and your phone should be on build number P1a42 S152 or higher to install the OTA update. If you have not received the OTA notification for Android 6.0 update on your Vibe P1, checkit by going to Settings -> About phone -> System updates -> Check for update.


If update found, let it download and install. Before applying the update, do remember to back up data you have on your phone. It is also recommended to factory reset your device after updating to Marshmallow.

Due to network issues and other unknown reasons, you might not be able to download and installthe OTA (over the air) update on your Lenovo Vibe P1. In that case, you can download the OTA update file on your computer and then install it manually

Manually update Lenovo Vibe P1 to Android 6.0 Marshmallow

Disclaimer: Follow the guide at your own risk. We will not be responsible for any damage that occurs. The guide is intended for technically talented users only.
1. Download Lenovo Vibe P1 Marshmallow OTA Update file [HERE] (1.6GB).
2. Rename the file as ‘update.zip’ and save it on your phone’s SD card
3. Boot your phone into Recovery mode, select ‘install update from sd card’ and select the update.zip file.
4. Once the process has finished the installation, reboot your phone and enjoy (source)

Wednesday, 12 July 2017

Update Lenovo K4 Note to Android 7.1.2 Nougat via Resurrection Remix OS


Lenovo K4 Note was launched with Android 5.1 Lollipop onboard and later it was updated to Marshmallow. Though the handset is capable for receiving the latest Nougat update, Lenovostopped providing updates to K4 Note. If you own this device and want to update it to latest Android 7.1.2 Nougat, then your only option is to flash a custom ROM like Resurrection Remix OS. If you are interested, check out the guide below.

In this guide, we show you how to update Lenovo K4 Note (A7010a48) to Android 7.1.2 Nougat via Resurrection Remix OS. Recently, Resurrection Remix released ROM based on latest Android version (currently Android 7.1.2) to many devices including Lenovo K4 Note. You can install the ROM via custom TWRP recovery and enjoy new features of Android Nougat.

For your information, Resurrection Remix OS is one of the best custom ROMs, which is now available for a variety of handsets, including K4 Note. The custom ROM offers various new features to enhance user experience. Resurrection Remix v5.8.3-V3.2 is based on Android 7.1.2 Nougat and the status is nightly.
Note: The below given file (Resurrection Remix v5.8.3-V3.2) is nightly build of Resurrection Remix OS which means the ROM is not yet fully ready to be used as a daily driver. However, previous experience shows that if you are ready to face few issues.


Prerequisites:
1. Your K4 Note should be rooted and latest version of TWRP recovery installed. [If you have not done it already, download TWRP recovery from here and flash it via ADB. Then download latest version of SuperSU zip file and flash via TWRP to get root access]
2. At least 50 – 80 percent battery charge remaining on the phone
3. Back up every data you have on the phone
4. Download latest version of Resurrection Remix (v5.8.3-V3.20 ROM from here
5. Download Android 7.2 compatible Gappas zip package (arm64/pico) from here

Update Lenovo K4 Note to Android 7.1.2 Nougat via Resurrection Remix OS

Disclaimer: Follow the instruction at your own risk. We will not be liable if any damage occurs to your device and/or its components. It is recommended for technically talented users only
1. Copy the ROM zip file and Gapps zip file to your device external storage
2. Now, turn off your phone and boot into TWRP recovery (press Volume Up and Power button at the same time)
3. Once you are in the recovery, go to ‘Wipe’ > Advanced Wipe > and then wipe Data, Cache and Dalvik Cache.
4. Now, go to ‘Install’, and then navigate to ROM zip file, which you have copied to external storage. After selecting, swipe to flash the ROM.
5. Install Gapps zip file in the same way.
6. Now, reboot your phone, set up your new ROM and enjoy.
Note that, the firs boot will take more time than usual, so stay patient. If you have any question with this guide, leave it in the comment section below.


Tuesday, 11 July 2017

This low price budget Redmi smartphone is breaking records in Indian market, see full spec

If you are looking for an affordable and good budget smartphone, then let's talk about affordable smartphones for you, whose battery backup and features are amazing. There are a lot of questions in people's mind about budget orientated smartphones. Which phone should they take and which one do not take, which phone is good and which phone is bad, it is a very tough question.But currently Redmi newly launched smartphone Redmi 4A is rocking in the Indian market and is breaking many records.
The price of this phone, though ₹ 5999, but its features are also good in comparison with bigger phone companies. The demand for this phone is so much that it is a bit difficult to order. To buy this phone, you will have to wait for its online flash sale which is available on Amazon and Redmi's website. Let you know that Xiaomi's Redmi 4A was launched in India in March. Millions of units were sold in just 30 days after the launch.
Speaking of the specifications of this phone, Xiaomi Redmi 4A has a 5-inch HD display with metal body design. It is equipped with Snapdragon 425 processor and Adreno 308 GPU. It also has 2GB of RAM and 16GB of internal storage. For photography, Xiaomi Redmi 4A has a 13MP rear camera. It has a 5MP front camera for selfie. It works on MIUI 8.0 based on the Android 6.0 Marshmallow operating system. Later you can update MIUI 8.5.10 by updating it. Xiaomi Redmi 4A has a good battery of 3120mAh,which you can use all day easily. For connectivity, it supports 4G Volte and all other connectivity options.

Sunday, 9 July 2017

Nokia Zeno Lite smartphone features, price and availability.

Nokia plans to come with a new phone; it is Nokia Zeno Lite smartphone. Besides that, the new Nokia mobile owns 4GB RAM, 3450mAh and more.
Nokia Zeno Lite smartphone specs and features:

As you see, Nokia has an impressive comeback with the new mobiles. Indeed, Nokia Zeno Lite smartphone is one of the upcoming Nokia phones which has amazing specs as well as features. Besides that, the new Nokia device comes with an aluminum body along with two curved sides. Moreover, the Nokia Zeno Lite specs contain a 5.0-inches display with a resolution of 1080 x 1920 pixels. Also, the new Nokia Zeno Lite has Gorilla Glass 5 for the protection screen.

Furthermore, the Nokia Zeno Lite cameras pack 24MP lens Pure View with Carl Zeiss optics on the rear and 12MP lens on the front-facing for selfies. With the new features of the back camcorder as the dual-LED flash, 4k video recording, bokeh effect which can help you have excellent shooters. For the new bokeh effect, it can blur the background and make the subject more remarkable. The Nokia Zeno Lite smartphone owns the latest technology for the photography; we believe that the mobile can bring wonderful moments for you.
Moreover, the Nokia Zeno Lite smartphone runs on Snapdragon 660 SoC octa-core 1.95GHz processor. Besides that, the Nokia Zeno Lite device offers 4GB RAM and 64GB ROM which can be expanded up to 256GB via microSD. Also, the new Nokia mobile works on Android Oreo 8.0 operating system. For the Nokia Zeno Lite battery life, the phone draws 3450mAh non-removable. Additionally, the upcoming Nokia Zeno Lite sports the connectivity options as LTE, USB, GPS, Wifi, Bluetooth, and 4G.


Nokia Zeno Lite smartphone price and availability

Finally, we expect that the Nokia Zeno Lite price is around $480 or Rs. 31018. Besides that, the Nokia Zeno Lite release date is going to be in September 2017. So, what do you think of the new Nokia Zeno Lite smartphone? Tell us your ideas.

This phone has 6050mAh battery which will run 4 days on a single charge.

The popular chinese smartphone maker is going to launch 6050mAH battery in India soon the name of this phone is ulefone power 2 its battery life is definitely one of its most attractive features because once it is charging it will last up to four days liike the oneplus redmi huawei honor this is also getting low price.
Specifications

This is equipped with 5.5 inch full HD screen it is powered by mediatek processor which comes with 4 GB RAM and 64 internal memory other features of this phone include fingerprint sensors to unlock this device runs with android nougat which makes the mobile smoother and powerful.
Special description

It has a 13 megapixel rear
The front camera is 8 megapixels
Given with led flash
Screen coming with gorilla glass 3
This phone has 6050 powerful battery
Its price is low. 

Ulefone is a chinese company but it is offering a low end smartphone with a lot of features the price of this in india will be 11,350 rupees power 2 will be competing all phones.

How you can inter recovery mode in Nokia 3

This tutorial explains how you can enter recovery mode on the Nokia 3 Android phone. Nokia recently unveiled their new Android smartphones, and we have our hands-on with the new Nokia 3. Typically, recovery mode is accessed by pressing phone buttons, but we haven’t been able to find any button combination that works for this phone. In Nokia’s case, the recovery acts as a central hub for all other debug and developer modes. The way to access is quite simple and straight forward. Whether you have a custom recovery like TWRP running or you are trying to access the stock one, this guide will apply to all. Nokia 3 smartphone ships with stock recovery which is user accessible and accessing it doesn’t void warranty. Read further to find out more details on how to access recovery mode on the Nokia 3.
Many of you might even have a custom recovery installed, like TWRP or ClockworkMod — the famous two. The custom recovery portal is quite big, it allows you to flash ROMs, mods and themes. If you are not into such heavy modifying, the recovery can act as a utility which you can use to format data, wipe cache and apply updates. Let’s move down further and see how can you enter Recovery Mode on the Nokia 3. Some Android phones, like the Sony Xperia series, do not come with a stock Android recovery at all, and in that case, we would have to load a custom recovery first to that phone and then enter it. However, Nokia Android phones do come with a stock recovery and some Android specific functions i.e. installing a software update, doing a full hard reset etc. are only performed through a Recovery Mode. Whenever you do them, the phone first takes you to the stock Android recovery and then performs that specific function.You can enter Recovery Mode on the Nokia 3 using the following two methods:
by ADB on Windows
by ADB on Mac OS X
Let’s have a look at each method below. You can use whichever way you find the easiest. The following steps can be used to enter Recovery Mode on the Nokia 3 (all variants).
Method 1 – Enter Recovery Mode using ADB on Windows

Step 1 – Download Android SDK from the Android Developers website and install. Also set it up by downloading platform-tools and USB drivers package in SDK. Tutorial given here: How to Set up ADB and Fastboot on Windows.
or
Step 1 –Download ADB / Fastboot – Android SDK Platform Tools separate package and install on your computer. Download from the following links depending on your OS and extract it anywhere in your computer.
Windows: Download platform-tools-latest-windows.zip
MacOS: Download platform-tools-latest-darwin.zip
Linux: Download platform-tools-latest-linux.zip
Step 2 – Connect Nokia 3 to the PC with a USB cable and install ADB drivers (if needed).
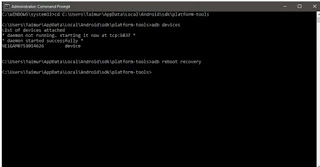
Step 3 – Navigate to <ANDROID-SDK-PATH>\platform-tools directory and open Command Prompt (Shift + Right-click anywhere in the folder > Open Command Prompt).
Step 4 – Type in the following command and press Enter.
adb reboot recovery.
Step 5 – Your Nokia 3 will turn OFF and then boot into the Recovery Mode. Navigate up and down using the volume keys and select with the Power button.
If you need any help regarding this, feel free to drop us a comment below or read: How to Enter Recovery Mode on Any Android Device.